
Google Tag Manager and Enhanced eCommerce
Step 1: Locate settings
- Log in to the application.
- Click on “Checkouts”.
- Click on “Settings”.
- Enable Google Tag Manager and Enhanced eCommerce

- Click on the “gear” Enter the Google Tag Manager ID.
- Click on “Save settings”
Step 2: Create a folder
- Go to the Google Tag Manager
- Click the Folders tab
- Create a new folder
- Name the folder Social Good Software
Step 3: Create variables
- Click on Variables
- Facebook Pixel
- Get the pixel ID of your organization and copy it to your clipboard
- Create a new variable
- Name it Facebook Pixel ID
- Under Variable Configuration, choose variable type as a constant
- Paste the value
- Click save
Step 4: GA Code
- Go to Google Analytics
- Get the ID of your property
- Go to the search bar and type “Measurement ID”
- Copy the GA4 Measurement ID, it would have the structure GTM-XXXXXXX
- Go back to Google Tag Manager and create a new variable
- Name it GA Code
- Under Variable Configuration, choose the variable type as a Constant
- Paste the value
- Click save
Step 5: Data layer variables
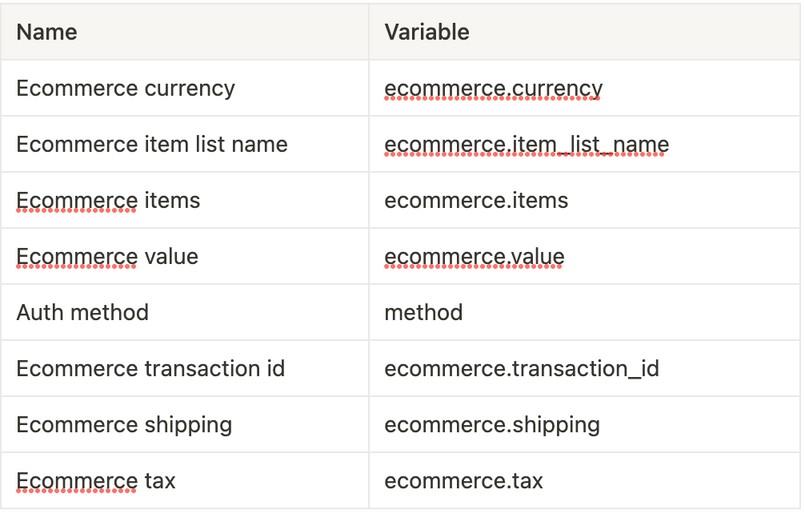
Select Data Layer Variable as the type and create these variables
Step 6: Create triggers
- Click on Triggers
Add to cart
- Create a new trigger and name it, Add to cart
- Click on Trigger Configuration and select Custom Event type At the Event name, put “add_to_cart”
- Click on save
View item
- Create a new trigger and name it View item
- Click on Trigger Configuration and select Custom Event type At the Event name, put “view_item"
- Click on save
Purchase
- Create a new trigger and name it Purchase
- Click on Trigger Configuration and select Custom Event type At the Event name, put “purchase”
- Click on save
Remove from cart
- Create a new trigger and name it, Remove from cart
- Click on Trigger Configuration and select Custom Event type At the Event name, put “remove_from_cart”
- Click on save
Login
- Create a new trigger and name it Log in
- Click on Trigger Configuration and select Custom Event type
- At the Event name, put “login”
- Click on save
Begin checkout
- Create a new trigger and name it Begin checkout
- Click on Trigger Configuration and select Custom Event type At the Event name, put “begin_checkout”
- Click on save
Select item
- Create a new trigger and name it Select item
- Click on Trigger Configuration and select Custom Event type At the Event name, put “select_item”
- Click on save
Sign up
- Create a new trigger and name it Sign up
- Click on Trigger Configuration and select Custom Event type At the Event name, put “sign_up”
- Click on save
View cart
- Create a new trigger and name it View cart
- Click on Trigger Configuration and select Custom Event type At the Event name, put “view_cart”
- Click on save
Step 7: Create tags
- Click on Tags
GA4 Config
- Create a new tag and name it GA4 Config
- Under Tag Configuration, select Google Tag type
- On the Measurement ID field type {{GA Code}}
- Check the Send a page view event configuration loads option
- At Triggering, selectAll Pages option
- Click save
Add to cart
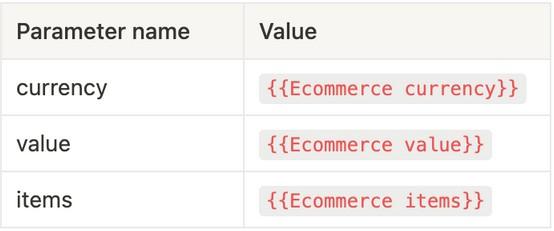
- Create a new tag and name it GA4 - Add to cart
- Under Tag Configuration, select Google Analytics: GA4 Event type
- On Configuration Tag, you can get a select and choose GA4 Config option
- At the Event Name, put “add_to_cart”
- Event Parameters
- At More Settings options, check Send Ecommerce Data option, in Data Sourceselect Data Layer option
- At Triggering, select Add to carttrigger
- Click save
Login
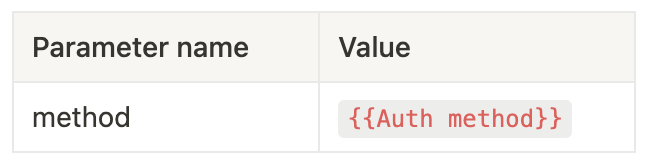
- Create a new tag and name it GA4 - Login
- Under Tag Configuration, select Google Analytics: GA4 Event type
- On Configuration Tag, you can get a select and choose GA4 Config option
- At the Event Name, put “login”
- Event Parameters
- At More Settings options check Send Ecommerce Data option, in Data Source select Data Layer option
- At Triggering, select Login trigger
- Click save
Begin checkout
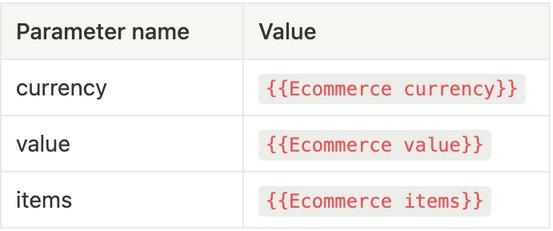
- Create a new tag and name it GA4 - Begin checkout
- Under Tag Configuration, select Google Analytics: GA4 Event type
- On Configuration Tag, you can get a select and choose GA4 Config option
- At the Event Name, put “begin_checkout”
- Event Parameters
- At More Settings options check Send Ecommerce Data option, in Data Source select Data Layer option
- At Triggering, select Begin checkout trigger
- Click save
Sign up
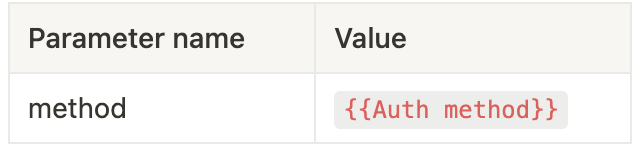
- Create a new tag and name it GA4 - Begin checkout
- Under Tag Configuration, select Google Analytics: GA4 Event type
- On Configuration Tag, you can get a select and choose GA4 Config option
- At the Event Name, put “sign_up”
- Event Parameters
- At More Settings options check Send Ecommerce Data option, in Data Source select Data Layer option
- At Triggering, select Sign up trigger
- Click save
Purchase
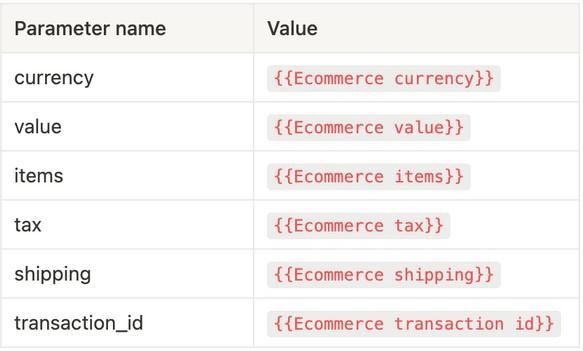
- Create a new tag and name it GA4 - Begin checkout
- Under Tag Configuration, select Google Analytics: GA4 Event type
- On Configuration Tag, you can get a select and choose GA4 Config option
- At the Event Name put “purchase”
- Event Parameters
- At More Settings options check Send Ecommerce Data option, in Data Source select Data Layer option
- At Triggering, select Purchase trigger
- Click save
Remove from cart
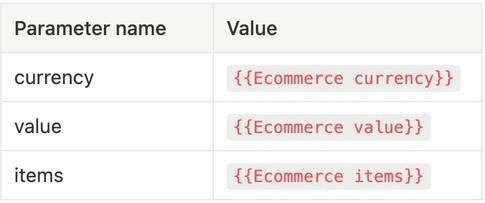
- Create a new tag and name it GA4 - Begin checkout
- Under Tag Configuration, select Google Analytics: GA4 Event type
- On Configuration Tag, you can get a select and choose GA4 Config option
- At the Event Name, put “remove_from_cart”
- Event Parameters
- At More Settings options check Send Ecommerce Data option, in Data Source select Data Layer option
- At Triggering, select Remove from cart trigger
- Click save
Select Item
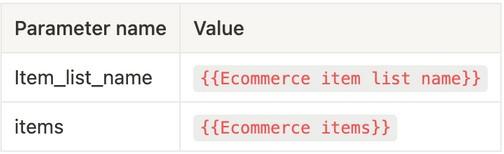
- Create a new tag and name it GA4 - Begin checkout
- Under Tag Configuration, select Google Analytics: GA4 Event type
- On Configuration Tag, you can get a select and choose GA4 Config option
- At the Event Name, put “select_item”
- Event Parameter
- At More Settings options check Send Ecommerce Data option, in Data Source select Data Layer option
- At Triggering, Select item trigger
- Click save
View Cart
- Create a new tag and name it GA4 - Begin checkout
- Under Tag Configuration, select Google Analytics: GA4 Event type
- On Configuration Tag, you can get a select and choose GA4 Config option
- At the Event Name, put “view_cart”
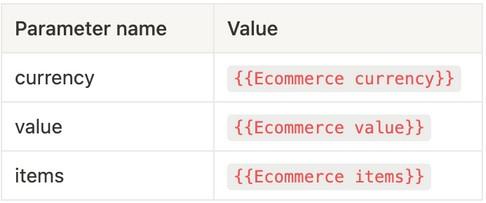
- Event Parameters
- At More Settings options check Send Ecommerce Data option, in Data Source select Data Layer option
- At Triggering, Select item trigger
- Click save
View Item
- Create a new tag and name it GA4 - Begin checkout
- Under Tag Configuration, select Google Analytics: GA4 Event type
- On Configuration Tag, you can get a select and choose GA4 Config option
- At the Event Name, put “view_item”
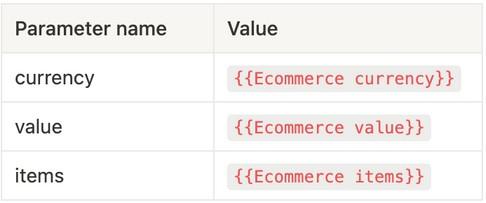
- Event Parameters
- At More Settings options check Send Ecommerce Data option, in Data Source select Data Layer option
- At Triggering, select View item trigger
- Click save
Facebook pixel
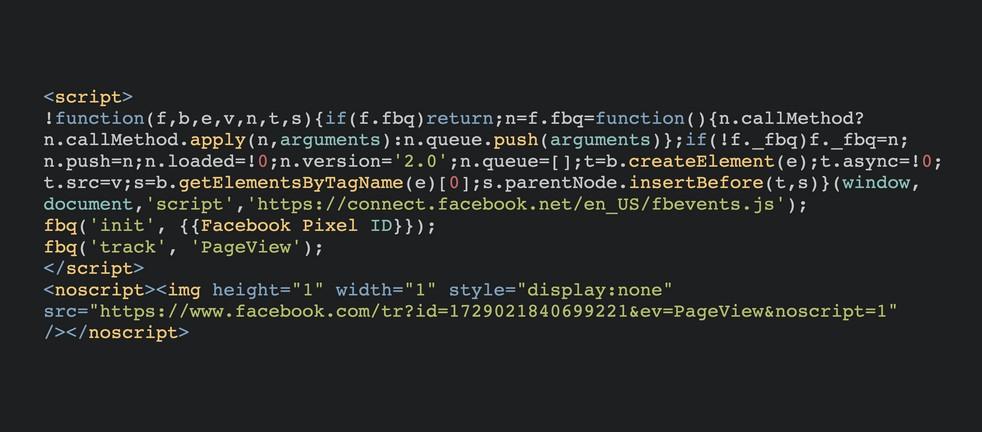
- Create a new tag and name it Facebook pixel
- Under Tag Configuration, select Custom HTML type
- On HTML value type:
- At Triggering select All Pages option
- Click save
FB - Purchase
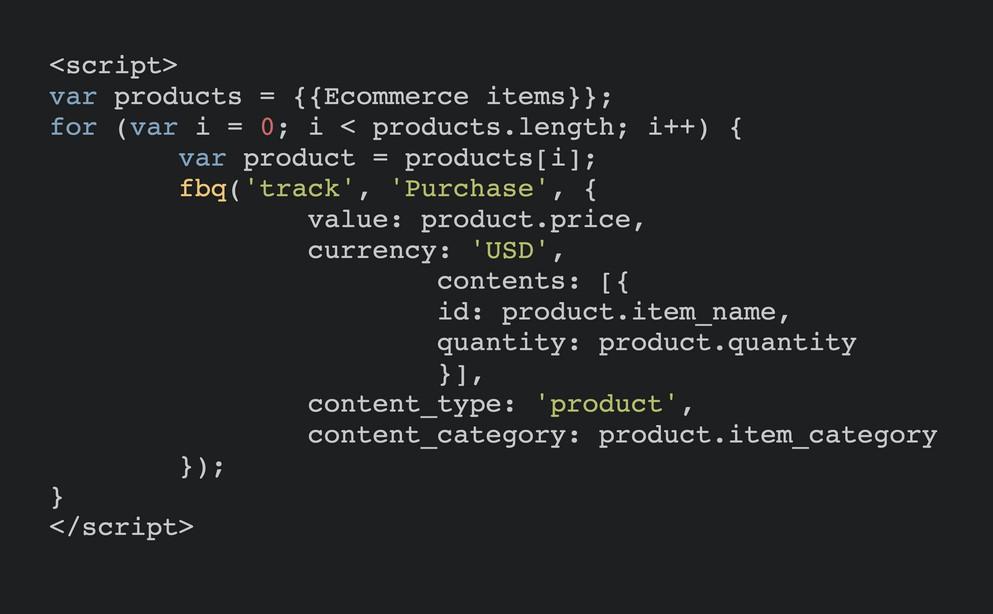
- Create a new tag and name it FB - Purchase
- Under Tag Configuration, select Custom HTML type
- On HTML value type:
- At Triggering select Purchase option
- Click save
FB - Add to cart
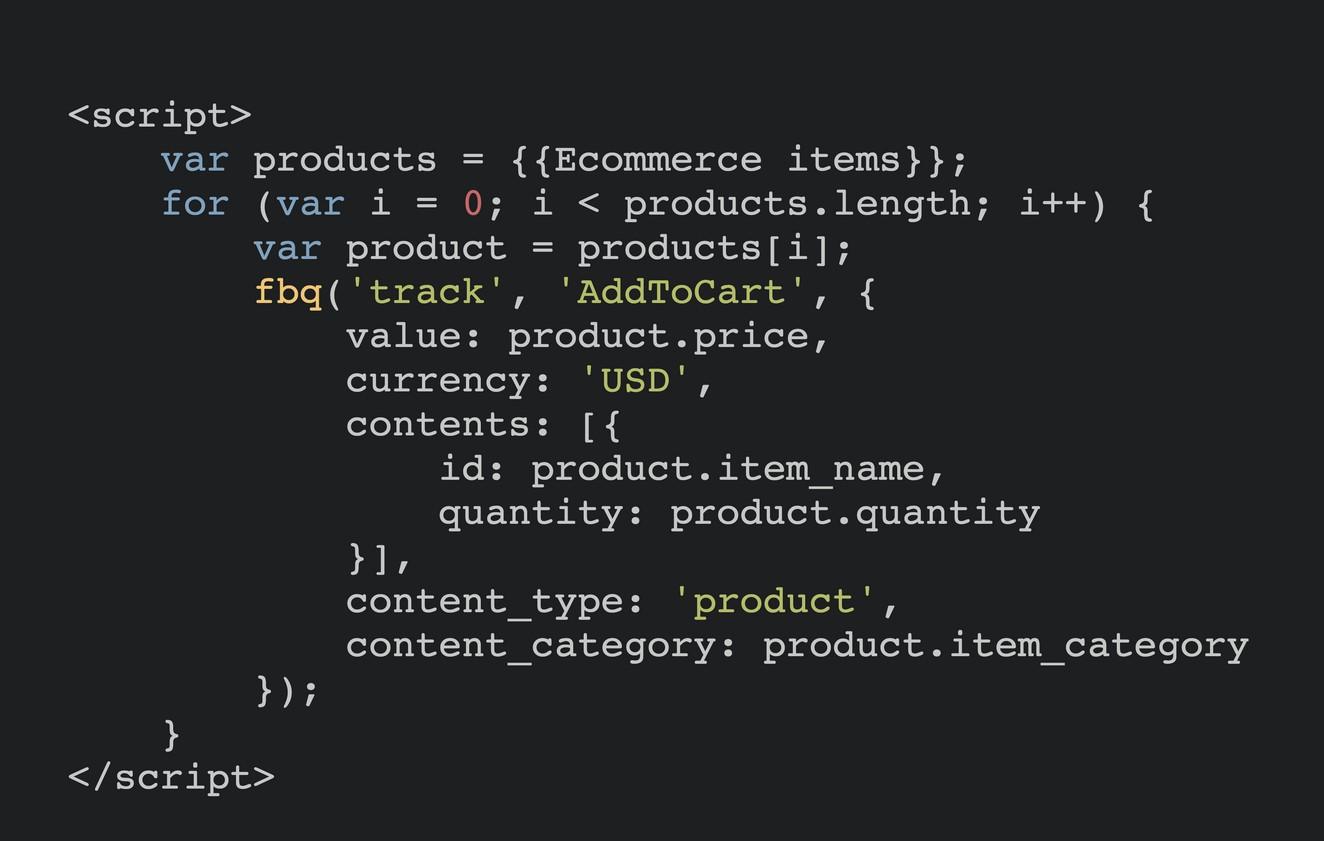
- Create a new tag and name it FB - Add to cart
- Under Tag Configuration, select Custom HTML type
- On HTML value type:
- At Triggering select Add to cart option
- Click save
Step 8: Setup Cross Domain linking
- Log into your Google Analytics property
- Navigate to the Admin section. You can find it at the bottom left of the interface
- Search and select the Data Streams option
- On the Data Streams page, locate the domain to which you want to configure the cross domain link and select it
- Once you are in the domain settings, find and click on the Configure tag settings option
- Select the Configure your domains option.
Step 9: Add domain
- You are now in the section where you can create domains
- Click the Add domain button.
- In the Match Type section, select the Contains option
- In the contains field, enter the following domain
- Click save
Step 10: Move all into Social Good Software folder
- Go to the Google Tag Manager
- Click the Folders tab
- At Unfilled items, select all and click on the Move option
- Select Social Good Software
- Double-check every folder and remove the unnecessary files or duplicates.
- Click submit and give a description, then Publish.