
Digital cards - Back of office (Auto-renew) - Welcome
The following email uses a membership query to automatically acknowledge an auto-renewal membership purchased through a manual entry or back of office process. This email is sent to the purchaser one (1) day after a membership purchase, renewal, upgrade or downgrade, and includes links to membership cards for each member included on the membership. Auto-renew memberships purchased online, or through advanced and daily sales, use the “Digital cards - Auto-renew - Welcome” email template.
Queryless process
Step 1: Access the Email Designer
- Navigate to and open the Social Good application.
- Go to the Email Designer section.
Step 2: Select a Template
- Click on the + Add email button.
- Navigate to Templates.
- Choose the Digital cards - Back of office (Auto-renew) - Welcome template.
Step 3: Configure Email Settings
- Edit and configure the following details for your email:
Name
Subject line
From name
From address
Domain (Confirm the correct domain)
Frequency (Confirm the frequency needed)
Step 4: Select Programs and Finalize
- Click on and select any amount of the required program names.
- Click on Create Email to complete the process.
Step 5: Write the email
Based on the email type, you’ll see we’ve pre-formatted a basic email design and provided sample text content based on the purpose of the email. We’ve also added field descriptor titles, field names, and a default grid if applicable.
Design your email
- Click on the “Designer” tab at the top right to start working with your email content.
Edit template content
- Click on the header image block at the top of the email.
- Click “Upload image”.
- Select the image and click “Open”.
- Click the image you uploaded.
- Close the dialog.
- Click on any “Text” block to edit text.
Add your content
- Write your paragraphs one at a time.
- Drag and drop the “Text” block into your email to add a new paragraph.
Add photo
- Drag and drop the “Image” block.
- Double-click the empty image.
- Click “Upload image”.
- Select the image and click “Open”.
- Click the image you uploaded.
- Close the dialog.
Save email
- Click on the save icon in the bottom right.
Step 6: Settings
Verify your settings
- Click on “Settings”.
- Verify “Digital membership card” is enabled.
- Click on “Grid” gear for settings.
- Verify the grid block is set for digital membership cards.
- Add a “Membership” tag to the email settings
- Click on “Save settings”.
Step 7: Test the email
Lookup membership to test
- Find a membership in your Altru query from the “Preview results” tab.
- Write down the email address.
Preview email content
- Click on the “Preview” tab in your email template.
- Enter the email address from your test membership into the “Search”.
- Click on that email address to open and view.
- Verify the fields correctly mapped to your test membership.
- Click on the membership card link(s) if applicable.
- Verify membership card details are accurate, if applicable.
Send test email
- Click on “Send email”.
- Replace email address with your email address.
- Click on “Send email”.
Verify you received email
- Open your email inbox.
- Verify you received the email.
- Verify the membership card links work, if applicable.
Verify email was attached to Altru
- Search for test membership in Altru by email address.
- Click on membership name to open membership details.
- Scroll to the “Documentation” section at the bottom.
- Verify the note is attached.
Remove the note type
- Click on the dropdown to open the note.
- Click on “Delete”.
- Click on “Yes” for the confirmation dialog.
Step 8: Enable email
Enable email
- Open your email in Email Designer.
- Click on “Settings”.
- Enable the “Start sending emails?” option.
- Click on “Save settings”.
Manual process
Step 1: Create the query
Information Library
- Click on “Analysis”.
- Click on “Information Library”.
- Click on “Add an ad-hoc” query.
- Click on “Membership” query type.
- Click on “OK”.
Sort the query
- Click on "Set sort and group options"
- Select the following field “Members\Primary member (DESC)”.
- Add it to the right column labeled “Set records by”.
- Click on “Z to A” to sort by descending order.
Save the query
- Click on the "Preview results".
- Verify that the number of rows/records is less than 15k.
- Click on the "Set save options".
- Name your query with “- SGS” at the end (Example: eTicket confirmation email - SGS).
- On the bottom right, click on "Save and close".
Export the query
- Click on the "Get OData link".
- Copy the OData link to use in the next step.
Step 2: Create the email
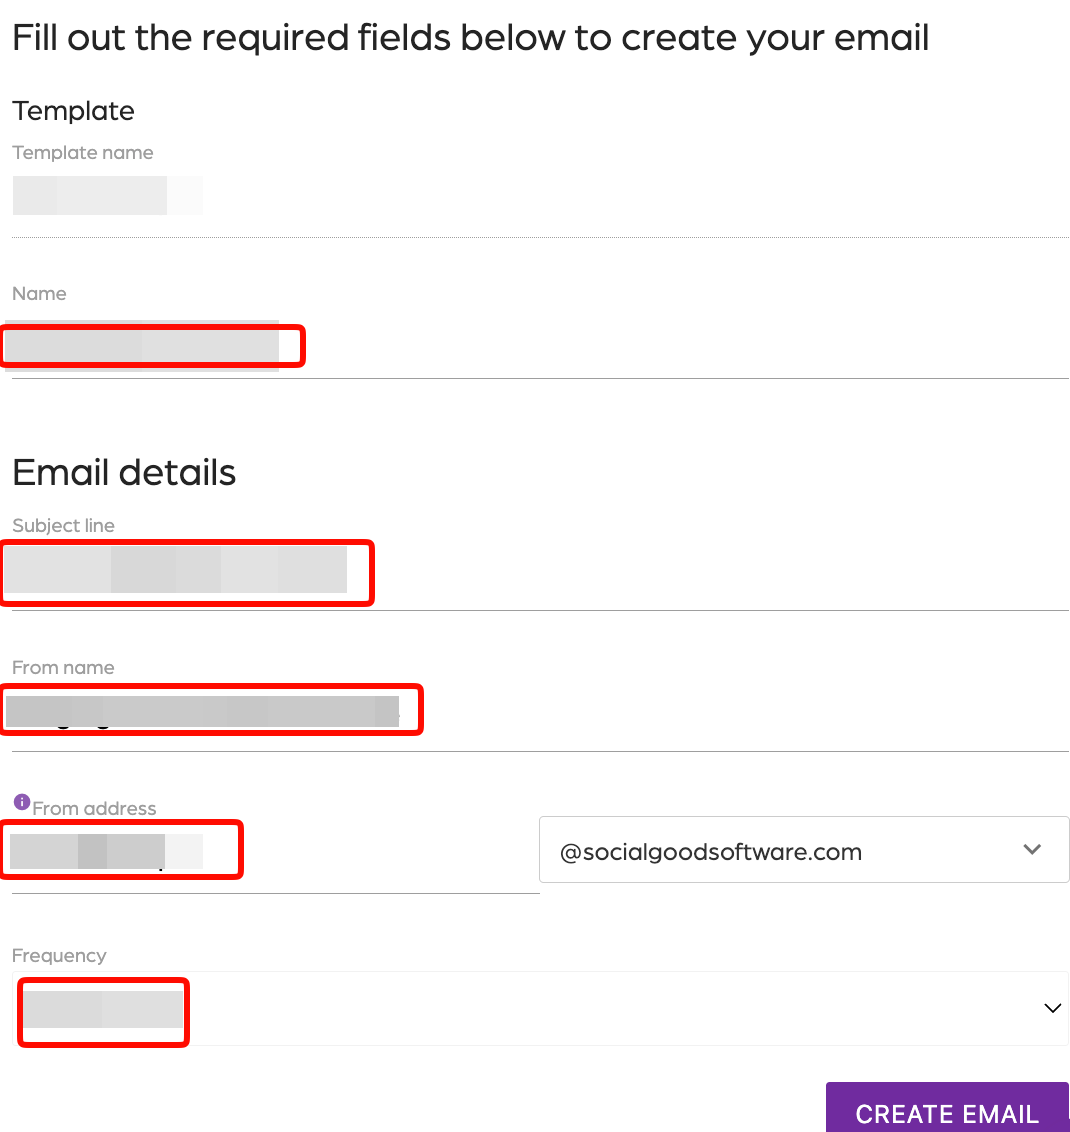
- Login to your Social Good Software account.
- Click on “Email Designer”.
- Click on “Add Email”.
- Click on “Custom”.
- Click on “Membership”.
- Enter the email additional details, name, subject line, from name, from address.
- Select the needed frequency.
- Click on “Create Email”.
- Click on the "Activity” tab.
- Click on the “Request Data” button.
- Click on the “Request Data” button to confirm.
- Click on the “Settings” tab.
Follow these steps:
- Click on the “+ Add Odata Links” button.
- Paste the Odata link from Altru.
- Click on the “Next” button.
- Once the link is validated.
- Click on the “Add link” button.
- Configure the “System record ID” as System record id and grouping key.
- Enable grouped fields from the list:
- “Members\Constituent\Name” or “Members\Constituent\First Name”.
- “Members\Constituent\System record ID”
- Select relative frequency, “Send email after the date”.
- Select relative days “1”.
- Select the Relative date “Membership Transaction\Revenue Application\Revenue Details\Date Added”
- Select a relative time for the email to be sent.
- Select note type based on the query.
- Click on the “Save settings” button.
Step 3: Write the email
Based on the email type, you’ll see we’ve pre-formatted a basic email design and provided sample text content based on the purpose of the email. We’ve also added field descriptor titles, field names, and a default grid if applicable.
Design your email
- Click on the “Designer” tab at the top right to start working with your email content.
Edit template content
- Click on the header image block at the top of the email.
- Click “Upload image”.
- Select the image and click “Open”.
- Click the image you uploaded.
- Close the dialog.
- Click on any “Text” block to edit text.
Add your content
- Write your paragraphs one at a time.
- Drag and drop the “Text” block into your email to add a new paragraph.
Add photo
- Drag and drop the “Image” block.
- Double-click the empty image.
- Click “Upload image”.
- Select the image and click “Open”.
- Click the image you uploaded.
- Close the dialog.
Save email
- Click on the save icon in the bottom right.
Step 4: Settings
Verify your settings
- Click on “Settings”.
- Verify “Digital membership card” is enabled.
- Click on “Grid” gear for settings.
- Verify the grid block is set for digital membership cards.
- Add a “Membership” tag to the email settings
- Click on “Save settings”.
Step 5: Test the email
Lookup membership to test
- Find a membership in your Altru query from the “Preview results” tab.
- Write down the email address.
Preview email content
- Click on the “Preview” tab in your email template.
- Enter the email address from your test membership into the “Search”.
- Click on that email address to open and view.
- Verify the fields correctly mapped to your test membership.
- Click on the membership card link(s) if applicable.
- Verify membership card details are accurate, if applicable.
Send test email
- Click on “Send email”.
- Replace email address with your email address.
- Click on “Send email”.
Verify you received email
- Open your email inbox.
- Verify you received the email.
- Verify the membership card links work, if applicable.
Verify email was attached to Altru
- Search for test membership in Altru by email address.
- Click on membership name to open membership details.
- Scroll to the “Documentation” section at the bottom.
- Verify the note is attached.
Remove the note type
- Click on the dropdown to open the note.
- Click on “Delete”.
- Click on “Yes” for the confirmation dialog.
Step 6: Enable email
Enable email
- Open your email in Email Designer.
- Click on “Settings”.
- Enable the “Start sending emails?” option.
- Click on “Save settings”.
You can find step-by-step instructions to create each of these email templates by viewing the Membership emails and Ticket emails sections.
Step 7: Maintenance
Verify emails are sending
- Click on “Activity”.
- Click on the calendar icon in the top left.
- Select a date.
- Verify emails are in the activity.
- Click on an email address to view the email sent.
Monitor and track
- Click on “Email Designer” in the left navigation.
- Select your email.
- Click on “Analytics”.
- Click on the calendar icon.
- Select a date.
- Review: “Sent”, “Bounced”, “Clicked”, “Opened”.
Review activity
Continue to monitor the “Activity” tab for emails sent.
Disable the email for maintenance
- Click on “Settings”.
- Disable “Start sending emails?”.
- Click on “Save settings”.
Additional Email Designer support articles can be found at our Knowledge base.