Setting up a calendar for multi-day events
Step 1: Create a query
Information Library
- Click on “Analysis”.
- Click on “Information Library”.
- Click on “Add an ad-hoc” query.
- Click on “Reservation” query type.
- Click on “OK”.
- Remove “Name” from “Results fields to display:”
Save the query
- Click on the "Preview results".
- Verify you receive fewer than 15k rows.
- Click on the "Set save options".
- Enter the name of the query.
- On the bottom right, click on "Save and close".
Export the query
- Click on the "Get OData link."
- Copy the OData link to use in the next step.
Step 2: Create a calendar
Log in to the SGS application
- Log in to the SGS application.
- Click on “Calendar Builder”.
- Click on “Create Calendar”.
Follow the steps in the dialog
- Add OData link.
- Select “Express - Auto map the fields from Altru to your Calendar” to have the calendar pre-configured.
- Click on “Create Calendar”.
Step 3: Settings
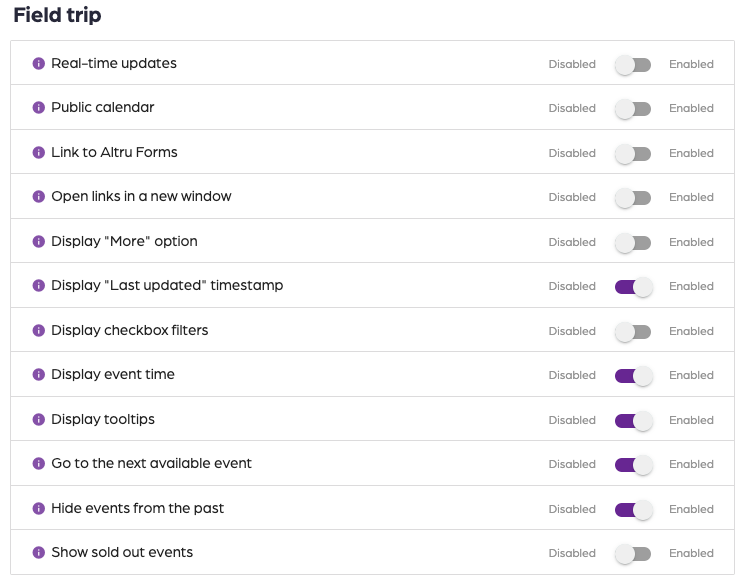
Disable the following options:
- Real-time updates
- Public calendar
- Link to Altru Forms
- Open links in a new window
- Display “More” option
- Display checkbox filters
- Show sold-out events
Map the query to the fields
tips_and_updates
You can map any field to the first option (Map the title). You are also able to map different fields for each query attached to a calendar.
- Click on the gear next to the query.
- Click on “Load default”.
- Verify the mapping matches your query.
- Adjust the mapping to match your needs.
- Click on “Save”.
Step 4: Test calendar
- Click on “Preview”.
- Select an event based on a date.
- Click on the event.
- Verify correct event form is shown.
Step 5: Enable calendar
Enable the calendar
- Click on “Settings”.
- Enable the “Real-time updates” option.
- Click on “Save settings”.
Step 6: Maintenance
Once you have enabled your calendar, you can continue to monitor for data and any errors using the “Activity” tab.
Review activity
- Click on “SYNC Activity”.
- Click on the calendar icon in the top left.
- Select a date.
- Verify calendar data is arriving.
Review events
- Click on “Preview”.
- Verify events are populating.
- Click on an event.
- Verify webform links are working.
tips_and_updates
If your links are not working, verify that you published your webform events in Altru. After publishing, clear the cache in settings.
Continue to monitor the size of your queries. If a query size gets close to 15,000 records, create a new query.
Once you have enabled your calendar, you can continue to monitor for data and any errors using the “Activity” tab.
Review activity
- Click on “SYNC Activity”.
- Click on the calendar icon in the top left.
- Select a date.
- Verify calendar data is arriving.
Review events
- Click on “Preview”.
- Verify events are populating.
- Click on an event.
- Verify webform links are working.
tips_and_updates
If your links are not working, verify that you published your webform events in Altru. After publishing, clear the cache in settings.
Continue to monitor the size of your queries. If a query size gets close to 15,000 records, create a new query.
Setting up a calendar for multi-day events
67452223faffbb5b3516494b
6745d5b68c083456b657dd05
"\nI> Confirm that you have created a multi-day package event in Altru.\n\n**Step 1: Create a query**\n\nI> Create a program query for packaged multi-day events in Altru. Make sure you see record(s) in your query results. If no information is found, adjust your query accordingly.\n\n\n**Information Library**\n\n- Click on “Analysis”.\n- Click on “Information Library”.\n- Click on “Add an ad-hoc” query.\n- Click on “Reservation” query type.\n- Click on “OK”.\n- Remove “Name” from “Results fields to display:”\n\n\n\n\n**Save the query**\n\n- Click on the \"Preview results\".\n- Verify you receive fewer than 15k rows.\n- Click on the \"Set save options\".\n- Enter the name of the query.\n- On the bottom right, click on \"Save and close\".\n\n\n\n\n**Export the query**\n\n- Click on the \"Get OData link.\"\n- Copy the OData link to use in the next step.\n\n\n\n**Step 2: Create a calendar**\n\n\n**Log in to the SGS application**\n\n- Log in to the SGS application.\n- Click on “Calendar Builder”.\n- Click on “Create Calendar”.\n\n\n\n\n**Follow the steps in the dialog**\n\n- Add OData link.\n- Select “Express - Auto map the fields from Altru to your Calendar” to have the calendar pre-configured.\n- Click on “Create Calendar”.\n\n\n\n**Step 3: Settings**\n\n\n\n**Disable the following options:**\n\n- Real-time updates\n- Public calendar\n- Link to Altru Forms\n- Open links in a new window\n- Display “More” option\n- Display checkbox filters\n- Show sold-out events\n\n**Map the query to the fields**\n\nT> You can map any field to the first option (Map the title). You are also able to map different fields for each query attached to a calendar.\n\n- Click on the gear next to the query.\n- Click on “Load default”.\n- Verify the mapping matches your query.\n- Adjust the mapping to match your needs.\n- Click on “Save”.\n\n**Step 4: Test calendar**\n\n\n- Click on “Preview”.\n- Select an event based on a date.\n- Click on the event.\n- Verify correct event form is shown.\n\n\n\n**Step 5: Enable calendar**\n\n**Enable the calendar**\n\n- Click on “Settings”.\n- Enable the “Real-time updates” option.\n- Click on “Save settings”.\n\n**Step 6: Maintenance**\n\n\nOnce you have enabled your calendar, you can continue to monitor for data and any errors using the “Activity” tab.\n\n**Review activity**\n\n- Click on “SYNC Activity”.\n- Click on the calendar icon in the top left.\n- Select a date.\n- Verify calendar data is arriving.\n\n**Review events**\n\n- Click on “Preview”.\n- Verify events are populating.\n- Click on an event.\n- Verify webform links are working.\n\nT> If your links are not working, verify that you published your webform events in Altru. After publishing, clear the cache in settings.\n\nContinue to monitor the size of your queries. If a query size gets close to 15,000 records, create a new query.\n\n\n\nOnce you have enabled your calendar, you can continue to monitor for data and any errors using the “Activity” tab.\n\n**Review activity**\n\n- Click on “SYNC Activity”.\n- Click on the calendar icon in the top left.\n- Select a date.\n- Verify calendar data is arriving.\n\n**Review events**\n\n- Click on “Preview”.\n- Verify events are populating.\n- Click on an event.\n- Verify webform links are working.\n\nT> If your links are not working, verify that you published your webform events in Altru. After publishing, clear the cache in settings.\n\nContinue to monitor the size of your queries. If a query size gets close to 15,000 records, create a new query.\n\n"
